How to Start a Vegetable Garden: A Beginner's Complete Guide
Growing your own vegetables is one of the most satisfying things you can do with outdoor space. A single 4x8 raised bed can produce hundreds of dollars worth of fresh produce over a growing season — and the flavor of a tomato picked ripe off the vine or a salad assembled from your own backyard is genuinely different from anything available at a grocery store.
The barrier to entry is lower than most people assume. You do not need a large yard, expensive equipment, or years of experience. You need a suitable location, decent soil, the right plants for your climate, and consistent attention to watering. This guide covers everything a beginner needs to go from bare ground to a productive vegetable garden.
Choosing the Right Site
Sun is the single most important factor in vegetable garden success. Most food-producing plants require a minimum of 6 hours of direct sunlight daily, and 8–10 hours produces the most abundant harvests. Before choosing a location, observe your yard at several times throughout the day over a few days and note which areas receive the most sun.
Sun Requirements by Crop Type
Full sun (6+ hours) — required for:
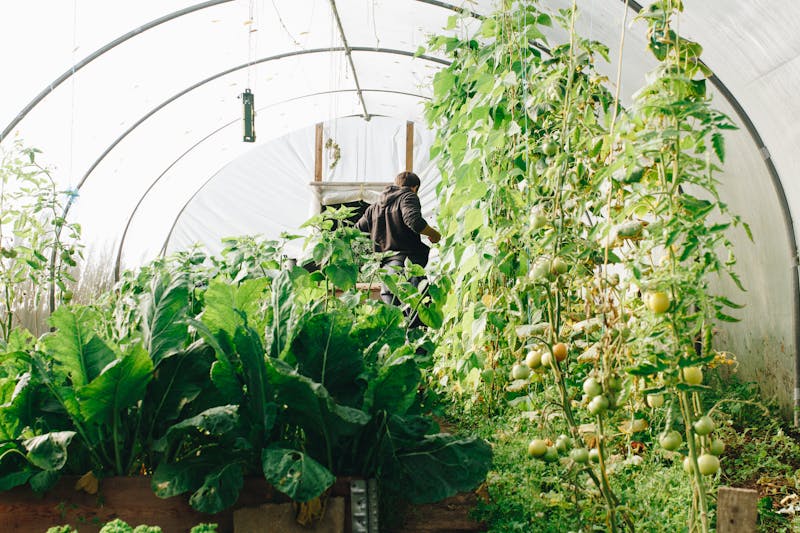
- Tomatoes, peppers, cucumbers, squash, melons, corn, beans, eggplant
Partial sun (4–6 hours) — adequate for:
- Lettuce, spinach, kale, chard, herbs (parsley, cilantro), radishes, beets
Note on shade in summer: Even areas with adequate sun in spring may become shaded in summer as deciduous trees leaf out. Observe your site in May or June, not March, before making a final decision.
Other Site Considerations
Proximity to a water source: Vegetable gardens need consistent irrigation. Locate your garden within easy reach of a hose outlet. Dragging hoses across the yard makes watering a chore instead of a habit, and watering habits are everything.
Flat, well-drained ground: Water that pools after rain creates anaerobic conditions that rot roots. If your chosen area has drainage problems, raised beds are the solution.
Proximity to the kitchen: A vegetable garden you pass on the way in and out of the house gets visited more often. More visits means you catch problems earlier, harvest at peak ripeness, and stay connected to what is growing.
Away from black walnut trees: Black walnut trees release a compound called juglone from their roots that is toxic to many vegetable plants, especially tomatoes and peppers. Avoid planting within 50–60 feet of a black walnut.
Raised Beds vs. In-Ground Gardens
This is the first major decision for most new vegetable gardeners, and both approaches work well. The best choice depends on your soil, budget, and physical situation.
Raised Bed Gardens
Raised beds are frames (typically 4–12 inches tall) filled with a custom soil blend. They sit on top of existing ground and can be installed almost anywhere — over grass, over compacted soil, over gravel, even on concrete with a solid bottom.
Advantages of raised beds:
- Complete control over soil quality — fill with ideal growing medium regardless of native soil
- Soil warms faster in spring, extending the growing season
- Excellent drainage — no waterlogging
- Easier to work — less bending and kneeling
- Fewer weeds (especially if installed over cardboard or landscape fabric base)
- Pest management is more contained
- Attractive, organized appearance
Disadvantages of raised beds:
- Higher upfront cost (materials + soil)
- Dry out faster than in-ground beds — may require more frequent watering
- Need to be refilled/amended each year as soil settles and nutrients are consumed
Ideal dimensions: 4 feet wide (reachable from both sides without stepping in), 8–12 feet long, 8–12 inches deep. For root vegetables like carrots and parsnips, go 12–18 inches deep.
Recommended product: Raised Garden Bed Kit Cedar Wood
In-Ground Gardens
In-ground gardening is the traditional approach — dig up an area of ground, amend the soil, and plant directly.
Advantages of in-ground gardens:
- Lower upfront cost — no frames or purchased soil needed
- Larger scale is easier to achieve
- Soil retains moisture more consistently
- Better for crops with very deep root systems (corn, pumpkins, melons)
Disadvantages of in-ground gardens:
- Dependent on existing soil quality — may require significant amendment
- More weed pressure
- Soil compaction is an ongoing issue if you walk on the beds
- Harder on the back and knees
Best for: Gardeners with decent native soil, those growing large crops like corn or melons, or anyone working with a larger footprint (100+ square feet).
Soil Preparation
Vegetables are heavy feeders. They need rich, loose, well-draining soil with plenty of organic matter to produce abundantly. Whether you are filling raised beds or working with native soil, this step is too important to rush.
For Raised Beds
The best all-purpose raised bed mix is often called “Mel’s Mix” (popularized by the Square Foot Gardening method):
- 1/3 blended compost (from multiple sources if possible)
- 1/3 peat moss or coco coir (for moisture retention and lightness)
- 1/3 coarse vermiculite (for drainage and moisture balance)
Pre-mixed raised bed soil is also available at garden centers and online and is a perfectly good alternative — look for a blend that includes compost, and avoid “topsoil” products, which are often too heavy and poorly draining for raised beds.
Recommended product: Premium Raised Bed Potting Mix with Compost
For In-Ground Beds
- Test your soil with an inexpensive soil test kit or by sending a sample to your local cooperative extension office. This tells you pH and nutrient levels, so you can amend precisely rather than guessing.
- Clear the area of grass and weeds. Use a flat spade to cut under the sod, or smother it with cardboard covered by 4–6 inches of compost (the “lasagna” method) a season before planting.
- Add organic matter. Spread 3–4 inches of compost over the entire bed and work it into the top 8–10 inches of soil using a garden fork or tiller.
- Adjust pH if needed. Most vegetables prefer a pH of 6.0–7.0. Add lime to raise pH (acidic soil), or sulfur to lower it (alkaline soil).
- Never work wet soil. Walking on or tilling wet soil destroys its structure. Squeeze a handful — if it crumbles when you open your fist, it is workable. If it stays in a ball, wait.
Choosing What to Grow
Start with plants that are easy to grow, productive, and that your household actually eats. There is no point in growing an abundance of zucchini if no one in your family likes zucchini.
Best Vegetables for Beginners
Tomatoes: The most popular home garden vegetable for good reason. Determinate varieties (bush tomatoes) are easier to manage than indeterminate (vining) types. Cherry tomatoes are the most productive and forgiving. Try ‘Sweet 100,’ ‘Sun Gold,’ or ‘Roma.’
Zucchini and summer squash: Extraordinarily productive — one or two plants is usually plenty for a family. Sow directly in the garden after frost danger has passed. Almost impossible to fail with.
Cucumbers: Fast-growing and rewarding. Grow on a trellis to save space and improve airflow. ‘Straight Eight’ and ‘Marketmore’ are reliable for beginners.
Lettuce and salad greens: Perfect for early spring and fall. Bolt in summer heat, so succession sow every 2–3 weeks for continuous harvest. Container-friendly and productive even in partial shade.
Bush beans (green beans): Direct sow after last frost. No staking needed. Harvest frequently to keep plants productive. ‘Blue Lake Bush’ is a classic, dependable variety.
Radishes: Germinate in 3–5 days and are ready to harvest in 25–30 days. Great for impatient gardeners and perfect for filling gaps between slower-maturing crops.
Kale and Swiss chard: Cold-hardy, nutritious, and incredibly productive. Kale improves in flavor after a light frost. Harvest outer leaves continuously from a single plant all season.
Herbs: Basil, parsley, cilantro, and chives are easy to grow and add disproportionate value relative to their garden space. Grow basil alongside tomatoes — they are natural companions.
Recommended product: Vegetable and Herb Seed Variety Pack for Beginners
Planting Schedule
The most common beginner mistake is planting too early. Warm-season crops planted before the soil and air have warmed sufficiently will sit stunted and vulnerable — and may not catch up to plants set out at the right time. Learn your last expected frost date (available at the Farmer’s Almanac website or your local extension office) and use it as the anchor for your planting schedule.
Cool-Season Crops (Plant 2–6 weeks before last frost)
These crops tolerate light frost and actually prefer cool growing conditions. They bolt and become bitter in summer heat.
- Lettuce, spinach, arugula, mustard greens
- Kale, Swiss chard, collards
- Broccoli, cabbage, cauliflower (start indoors 6–8 weeks before last frost)
- Peas (direct sow as soon as ground is workable)
- Radishes, turnips, beets
Fall planting: Many cool-season crops can also be planted in late summer for a fall harvest. Count backward from your first expected fall frost to determine planting dates. A second cool-season planting in August or September can be just as productive as spring.
Warm-Season Crops (Plant after last frost)
These crops are killed by frost and require warm soil (at least 60°F) to thrive.
- Tomatoes, peppers, eggplant (start indoors 6–8 weeks before last frost; transplant after frost)
- Cucumbers, squash, zucchini, melons (direct sow or transplant after frost)
- Beans, corn, basil (direct sow after frost)
Starting from transplants vs. direct seeding: Many warm-season crops are purchased as transplants from a garden center, which saves 4–8 weeks compared to starting from seed. Transplants are worth the small premium for crops like tomatoes and peppers. Direct seeding is perfectly adequate for beans, squash, cucumbers, and root vegetables.
Watering and Fertilizing
Watering
Vegetables need consistent moisture — not constantly wet soil, but consistent access to water as they grow. Most vegetable gardens need 1–1.5 inches of water per week from rain or irrigation.
Best practices:
- Water deeply and infrequently rather than shallowly every day. Deep watering encourages deep root growth.
- Water at the base of plants, not overhead. Wet foliage promotes fungal disease.
- Water in the morning so foliage dries during the day.
- Drip irrigation or soaker hoses are ideal — they deliver water directly to the root zone and keep foliage dry.
- Mulch beds with 2–3 inches of straw or shredded leaves to retain moisture and reduce watering frequency.
Fertilizing
Healthy soil with abundant compost significantly reduces fertilizer needs, but vegetable gardens — especially in raised beds — benefit from supplemental feeding throughout the season.
A simple approach:
- At planting: incorporate a balanced slow-release granular fertilizer (like 10-10-10 or an organic equivalent) into the soil.
- Mid-season: side-dress heavy feeders (tomatoes, corn, squash) with compost or a balanced fertilizer when plants begin flowering.
- Tomatoes specifically benefit from a low-nitrogen, higher-phosphorus and potassium fertilizer once they begin setting fruit — too much nitrogen produces lush foliage at the expense of fruit.
Recommended product: Organic Vegetable Garden Fertilizer
Pest Management
Pest pressure is one of the most discouraging aspects of vegetable gardening for beginners, but most problems are manageable with early identification and a few targeted strategies.
Common Vegetable Garden Pests
Aphids: Tiny, soft-bodied insects in colonies on stems and undersides of leaves. Blast off with a strong stream of water, or spray with diluted neem oil. Attract beneficial insects (lacewings, ladybugs) by planting flowers nearby.
Slugs and snails: Cause irregular holes in leaves, mostly active at night. Diatomaceous earth around plant bases, copper tape for raised beds, or iron phosphate bait (safe for pets and wildlife) are effective controls.
Tomato hornworms: Large green caterpillars that can strip tomato plants rapidly. Hand-pick and destroy. If you see hornworms with white cocoon-like structures on their backs, leave them — those are parasitic wasp eggs that will control future hornworm generations.
Squash vine borers: Larvae that burrow into squash and zucchini stems. Difficult to treat once inside. Prevent by using row cover early in the season or wrapping stem bases with aluminum foil.
Deer and rabbits: Physical exclusion is the only reliable solution. A 4-foot fence deters rabbits; a 6–8 foot fence is needed for deer. Raised beds with a simple wire frame can protect smaller gardens.
Preventive Strategies
- Rotate crops annually. Do not plant the same family of vegetables in the same location two years in a row. Rotation breaks pest and disease cycles.
- Inspect plants regularly. Catching problems early — before populations explode — is far easier than treating a severe infestation.
- Plant resistant varieties. Seed catalogs note disease resistance for most vegetables. For tomatoes, look for V, F, N, T, A codes indicating resistance to common diseases.
- Encourage beneficial insects. Plant flowering herbs and annuals (dill, fennel, alyssum, marigolds) near the vegetable garden to attract parasitic wasps, ladybugs, and other pest predators.
Essential Garden Tools
You do not need a lot of tools to maintain a productive vegetable garden, but a few quality basics make the work easier and more enjoyable.
- Garden trowel: For transplanting seedlings and spot-digging
- Garden fork or broadfork: For loosening soil without destroying its structure
- Hoe or cultivator: For weeding between rows
- Watering can or hose with adjustable nozzle: For targeted watering without displacing seedlings
Recommended product: Garden Hand Tool Set for Vegetable Gardens
A vegetable garden rewards consistency more than expertise. Check on it daily if you can — even a five-minute walk-through each morning lets you catch watering needs, pest problems, or crops ready to harvest before they become issues. Start small enough that it feels manageable, produce results that motivate you to expand, and let your confidence grow alongside your harvest.

TurfTech HQ Editorial Team
Independent trade-focused editorial team